Retrieving Data from APIs
Retrieving Data from APIs
Overview
- APIs provide useful data we can use in our device (e.g. weather and location data)
- Each API will be configured slightly differently but the process to connect is generally similar
##

##

##

##

##

Steps to Connect Photon 2 and API
- Determine how to use the API
- Create an integration -> webhook on Particle console
- Use
Particle.publishto trigger webhook - Use
Particle.subscribeto “listen” for response from webhook - Create Mustache template that tells the Particle Cloud to which relevant data from the response should be to the Photon 2 (and the rest of the data will be ignored)
- Create function handler that is used by
Particle.subscribeto process JSON
Step 0: How to use the API
- Each API is different, but they will usually have documentation that describes how to connect
- Typically, this will include
- Endpoint (URL you communicate with)
- Parameters to include in your request (e.g. name of city you want weather data for)
- How to obtain an API key (if necessary)
Step 0: How to Use the API
Example: WeatherStack

Step 1: Create Webhook In Particle Console
Particle integration settings

Part 2: Publish Event to Trigger Webhook
Photon 2 firmware
void loop() {
  String data = "90089";	//USC zip code

   // Trigger the integration
  Particle.publish("JSONWeatherStack", data, PRIVATE);

   // Wait 60 seconds
  delay(60000);
}
Part 3: Subscribe to JSON response from Weather Stack
Photon 2 firmware
void setup() {
  // Subscribe to the integration response event
  Particle.subscribe("hook-response/JSONWeatherStack",
                      jsonSubscriptionHandler, MY_DEVICES);
}
##

##

##

##

##

Part 4 : Create Mustache template
- Often we might only want a few items from the JSON, but the webserver sends the entire message
- This extra data can waste time, bandwidth, power, and the response size can create errors
- Instead, we can have Particle webserver send us only the data we actually want by creating Mustache templates
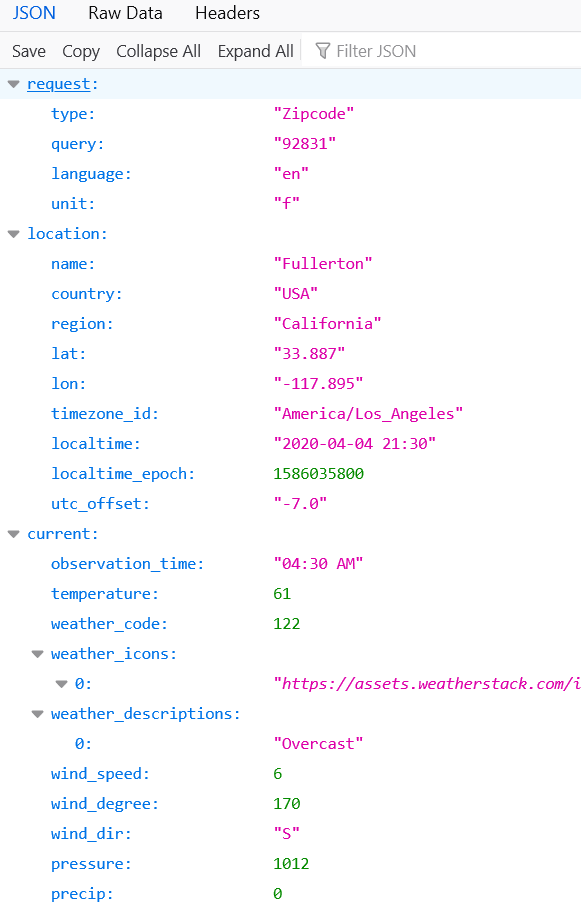
Example: Entire Weather Stack JSON Response
Example: What if we only want the temperature?
Creating Mustache Webhook Response Templates
Particle Console Webhook
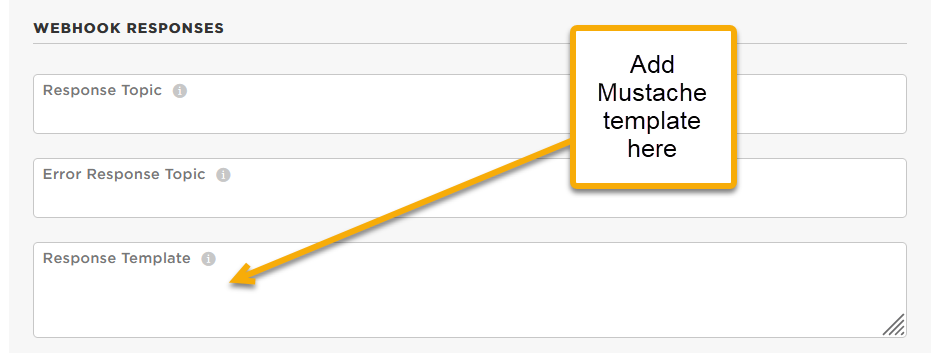
Example: Mustache Format
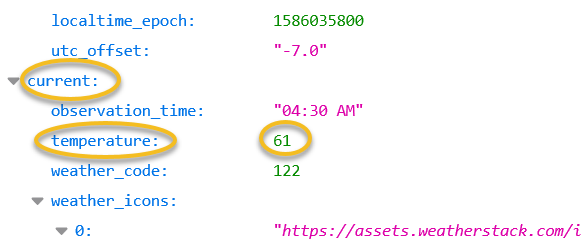
- If we are only interested in the
temperaturevalue which is nested in thecurrentobject, we could create a template like the following
{"temp":"}"}
- Now instead of the server sending entire JSON response, it will only send the following
{"temp":"61"} - For webhook response templates, make sure the template will always result in valid JSON (i.e.
{"name":"value"})
Part 5: Creating the function handler to receive and parse the JSON
- The last step is to create Photon 2 code to handle / parse the JSON response
- While it is possible to manually parse JSON in C++, it is considered unsafe due to potential for security vulnerabilities
- Instead, use a library
- Instruction and examples for parsing JSON with
ArduinoJson
Resources
Credits
- Photo by Inset Agency on Unsplash