Argon BLE Syntax
Argon BLE Syntax
Overview
- Present basic guide to receiving data from phone app to Argon
- To simplify some of the code, we will be using a custom-built BLE library
- For more in-depth information including sending from Argon and connecting to multiple devices
Receiving Data with Argon
void onDataReceived(const uint8_t* data, size_t len,
                    const BlePeerDevice& peer,void* context);
- After a BLE connection is made,
onDataReceivedis the event handler that is called when data is received by the Argon - We are only concerned with the first two parameters:
dataandlen
Receiving Data with Argon
const uint8_t* datauint_8is the variable type for unsigned byte (8 bits)const uint8_t*is a pointer, which in C++ indicates the start of an arraydatarepresents an array of bytes
size_t lenrepresents the number of bytes that were received
Handling Pointers
- Pointers are powerful, wonderful, and complex C++ tool
- However, we are just going to treat
dataas an array
Example
-
Let’s say the
onDataReceivedparameterlenequal 5 -
We can then treat the
datavariable as an array of bytesSerial.println("First element: " + String(data[0])); uint8_t thirdByte = data[2]; uint8_t sixthByte = data[5]; //ERROR! len = 5; arrays start at 0
Bluefruit App
- When sending data over Bluetooth, data will be packaged in bytes
- It is important to know ahead of time the format of the data
- We will be using Adafruit’s Bluefruit app to communicate with Argon
- The data structure is specific to this app and doesn’t apply to other apps
- For reference: Adafruit Bluefruit Guide
Bluefruit App Commands
- Each command from the app is a series of bytes
- IMPORTANT:
charvariables or single letters are also bytes
- IMPORTANT:
- The first byte is the
charof! - The second byte signals the type of command
- For example
Bmeans a button on the control pad was pressedLmeans that location data from the phone is being send
Bluefruit App Control Pad
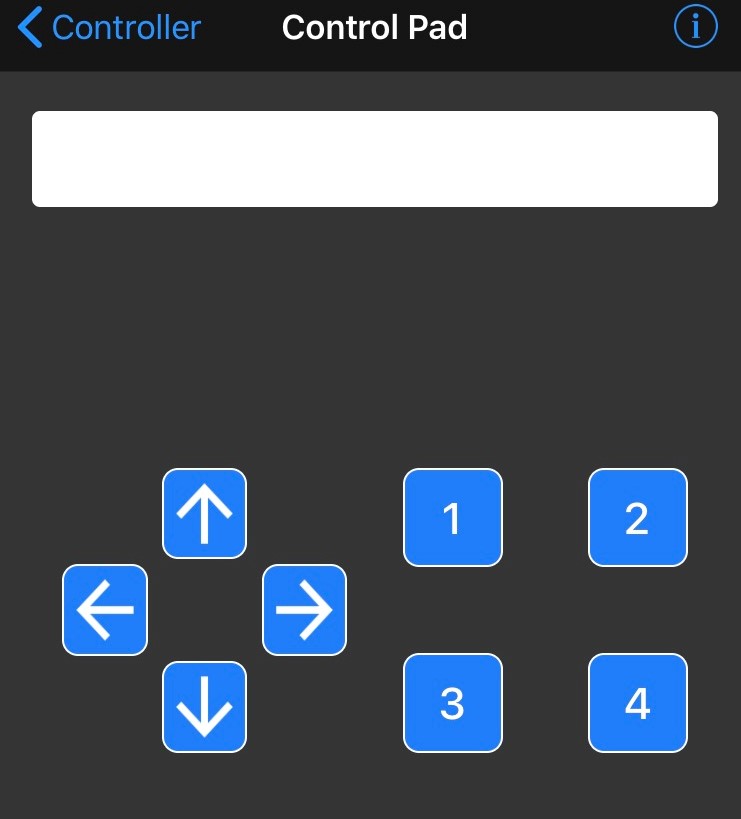
Bluefruit App Control Pad
- Button presses send 5 bytes
[‘!’] [‘B’] [BUTTON_CODE] [BUTTON_STATE] [CRC]
BUTTON_CODErepresents the symbol pressed (e.g. button was would be'1')BUTTON_STATErepresents if the button was pressed ('1') or released ('0')CRCis an error-checking byte (we won’t worry about it for now)
Examples
- Pressing the 3 button means that the
data“array” would have the values
[‘!’] [‘B’] ['3'] ['1'] [CRC]
- Releasing the Up arrow button means that the
data“array” would have the values
[‘!’] [‘B’] ['5'] ['0'] [CRC]
Lab: Control Fan
- Use Bluefruit app to control a DC motor and servo motor
- Download starting code
- Go to https://bit.ly/ProjectZip
- Paste the following link into the top right https://github.com/reparke/ITP348-Physical-Computing/tree/main/_exercises/week09/ble_fan_start
- In Bluefruit app, connect to over UART (listed as “controller”)
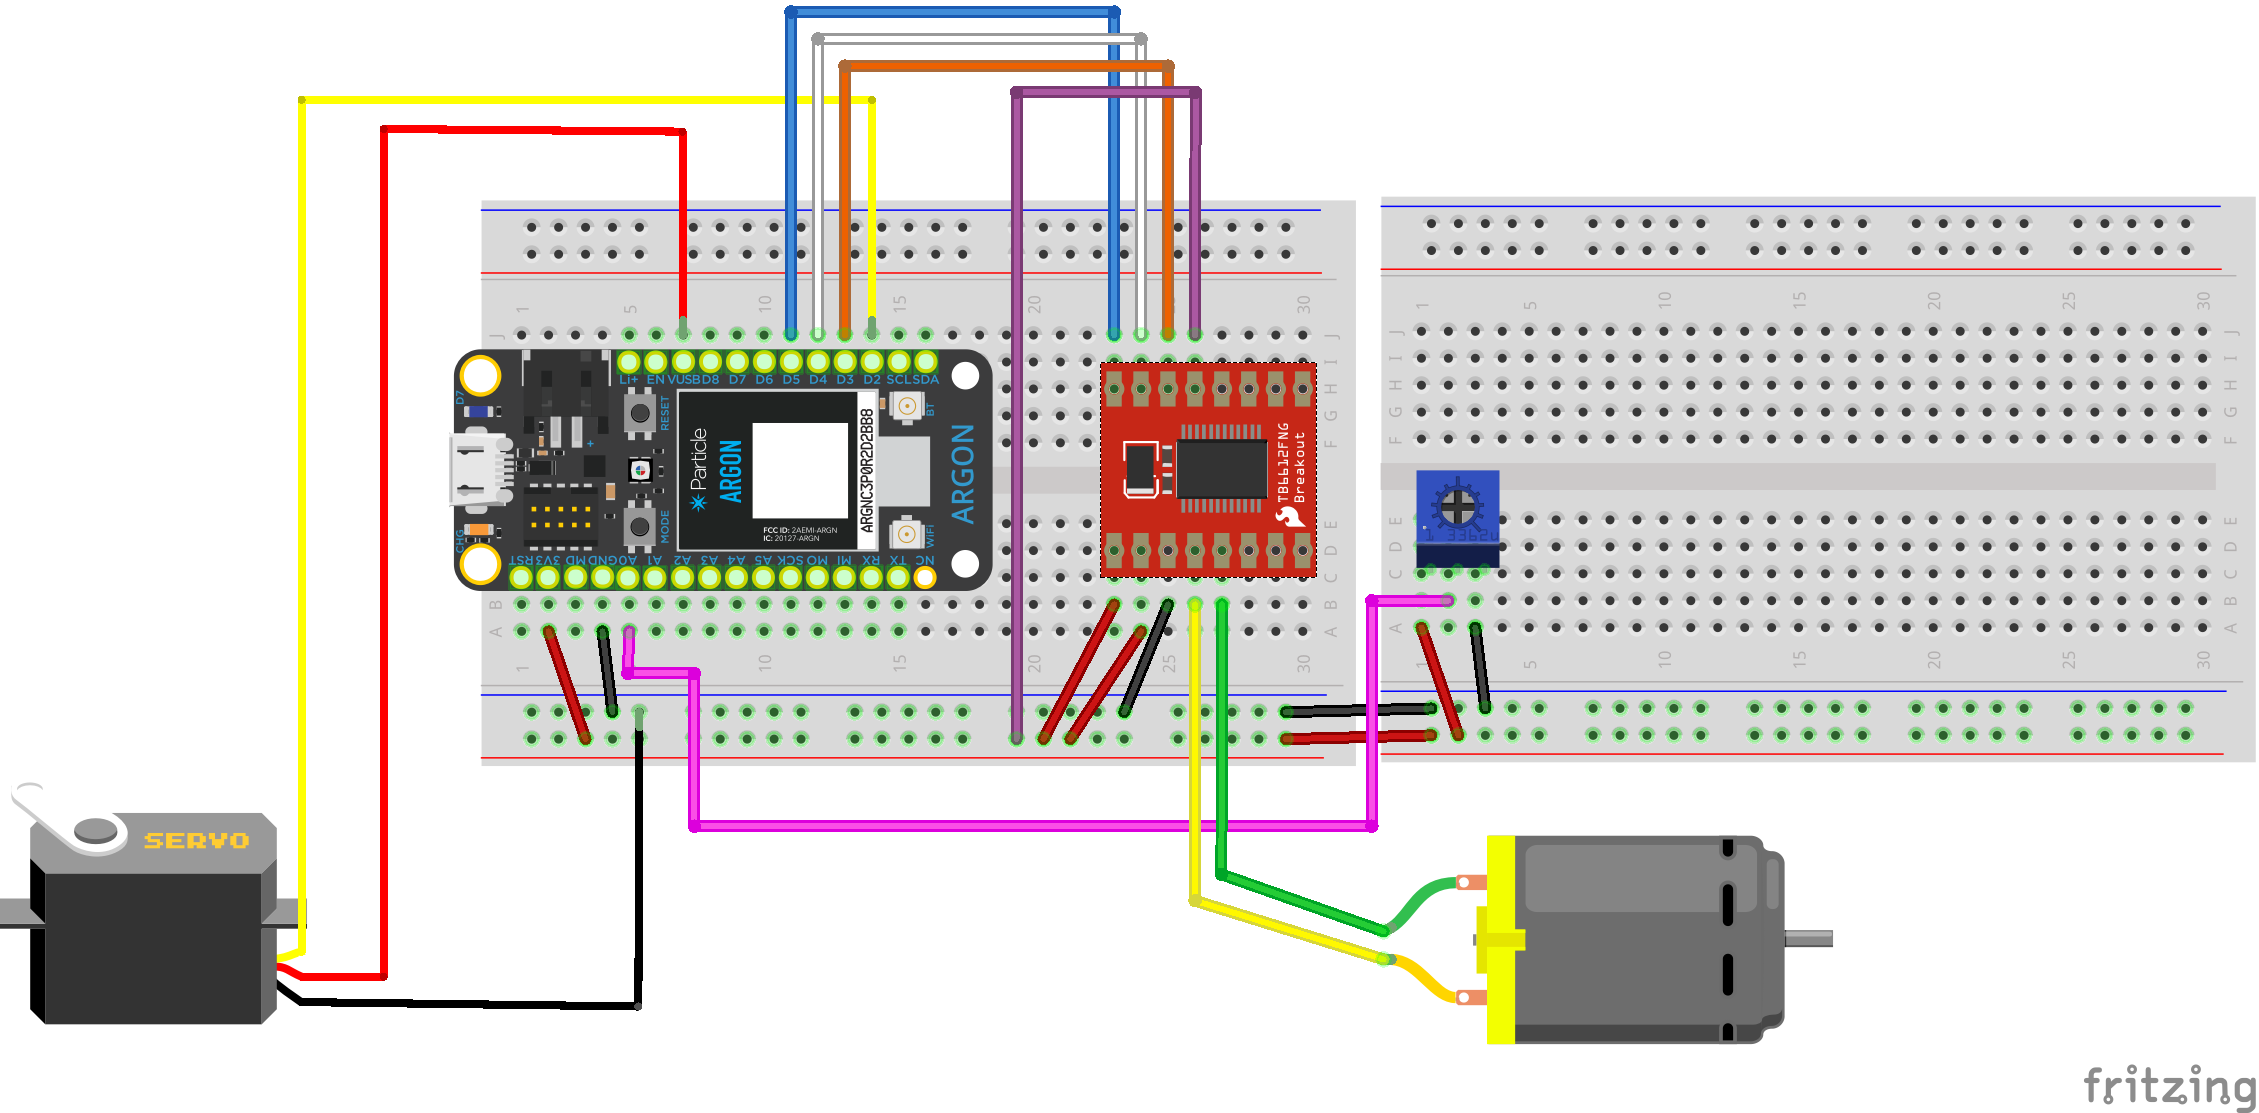
Lab Wiring Guide
On-board LED    D7
Servo           D2

Motor Controller
 PWMA           D5
 AIN2           D4
 AIN1           D3
 VCC            3v3
 GND            GND
 VM             3v3
 STBY           3v3
Lab: Control Fan (part 1)
- Specifications
- When “1” is pressed down, on-board LED D7 will blink twice
- When “2” is pressed down, on-board LED D7 will turn on
- When “2” is released, on-board LED D7 will turn off
- Reference: Adafruit Bluefruit Guide
Lab: Control Fan (part 2)
- Specifications
- When “RIGHT” is pressed down, rotate servo (by fixed amount) clockwise
- When “LEFT” is pressed down, rotate servo (by fixed amount) counter clockwise
- When “UP” is pressed down, speed up motor (by fixed amount)
- When “DOWN” is pressed down, slow motor(by fixed amount)
- Optional challenge:
- When “3” is pressed down, change direction of DC motor
- When “4” is pressed, turn on fan auto mode
- Reference: Adafruit Bluefruit Guide
Demo Projects
- The following two completed projects are provided
- Each involves using a phone app to communicate with Argon via Bluetooth
- The coding in these examples is much more complicated than the previous exercises
Demo #1: Control RGB LED with Phone Accelerometers (part 1)
- Use Bluefruit app to send accelerometer data from phone to Argon
- Control RGB LED colors with accelerometer data
- Download starting code
- Go to https://bit.ly/ProjectZip
- Paste the following link into the top right https://github.com/reparke/ITP348-Physical-Computing/tree/main/_exercises/week09/ble_uart_rgb_accel_example
Demo #1: Control RGB LED with Phone Accelerometers (part 2)
- Using Bluefruit, connect to over UART (listed as “controller”) in app
- Enable “accelerometer” in app
- Argon sketch will receive accelerometer data (X, Y, Z) from phone, convert readings to PWM (0-255), and change LED color
- Reference: Adafruit Bluefruit Guide
##
Demo #2: Read Health Thermometer Service (part 1)
-
Send temperature data from Argon to phone via nRF Toolbox
-
Argon is using Bluetooth health thermometer service
-
Download starting code
-
Paste the following link into the top right https://github.com/reparke/ITP348-Physical-Computing/tree/main/_exercises/week09/ble_health_temp_final
Demo #2: Read Health Thermometer Service (part 2)
- Using nRF Toolbox app, connect to over HTM (“health thermometer”)
- Argon sketch will send temperature data to app
- Reference: Particle Guide
##
References
Credits
- Images created with Fritzing